So in my last blogpost I said that there was one more Christmas present I still had to show you, but that it needed its own post.
This is it.
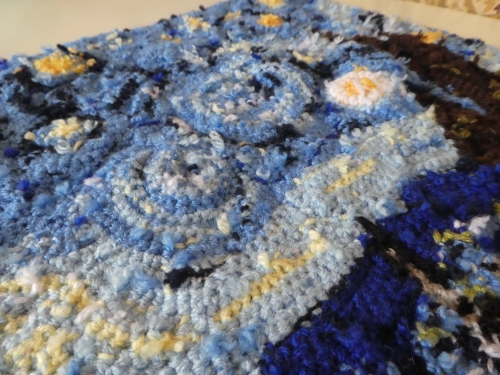
This is Van Gogh’s The Starry Night, rendered in freeform crochet.

Before we go any further into exploring this, let me stress that this was freeform crochet. That means that there is no pattern. There never will be a pattern. Don’t even ask, because I wouldn’t be able to do it!
I started this project back in August, and there’s a reason I haven’t shared updates with you all. The reason is that this was a Christmas present for my mother. The Starry Night is one of her favourite pictures. She has a Starry Night case for her ipad. She loves the episode of Doctor Who, ‘Vincent and the Doctor’, that features Van Gogh and this painting (among many others). It was, I knew, the perfect picture to recreate, if I was going to attempt to recreate anything of the kind in crochet.
And I was absolutely determined that it would be a secret. Even if she realised I was working on something for her for Christmas, she wouldn’t be able to guess what it was. So of course I couldn’t blog about it, because she reads this blog (hi, Mum). And I succeeded! She had no idea I was working on something like this, and no idea what was wrapped in this particular present under the Christmas tree. She was fairly stunned.
To begin at the beginning: some time back in August, I found myself thinking ‘I wonder if I could crochet Mum a version of Starry Night for Christmas’. And then I did a bit of googling, and discovered that Google Arts and Culture have scanned in, in extremely high definition, quite a number of important works of art…including The Starry Night. I could see the whole, but also zoom in to focus on the small details.
I had never done freeform crochet before. And this would not be an easy beginning. That much I knew. And yet I love a challenge, and I wanted to see if I could do it. I wanted to see if I could use my stitches to recreate the brush strokes of Van Gogh, to recreate the swirling sky with the stars and the moon and the colours. I knew that, if I succeeded, my mother would love it – and if I failed, then she would never need to know!!
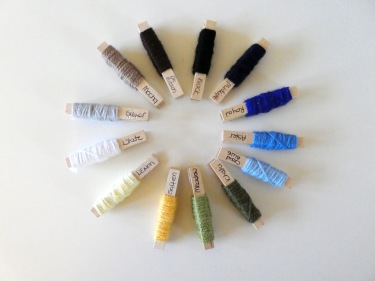
Having decided to give it a go, I then had to choose colours. And where else would I go for a great variety of colours but to Stylecraft Special DK? So many colours, as well as being my favourite ‘every day’ yarn (as in a yarn I will happily work with every single day for weeks/months/years on end!).
I chose black, dark brown, mocha, silver, white, lemon, saffron, meadow, khaki, cloud blue, aster and midnight, matching the colours as closely as I could to the colours Van Gogh used in the painting. I added royal in at a later date, bringing my total number of colours up to thirteen. Most of these I had in my stash, in varying quantities, which means I have absolutely no idea how much yarn I ended up using. An awful lot of aster! But lots of the other colours, too. I think the colour I ended up using least was mocha, but it’s perfect where I do have it.
Although I couldn’t blog about it here, I did blog about it on my tumblr blog, which is full of fannish geekery and therefore of no interest to my mother whatsoever. So all the pictures that follow include the caption/comments I wrote when I posted progress pictures. You will have to click on some pictures to see the full caption, and all pictures were taken with my mobile, often in artificial light, so forgive the picture quality!
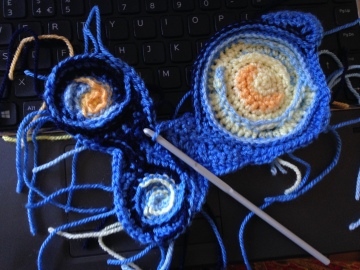
How to begin it? Well, I thought, break it down into shapes. Start with something easy, and go from there. I knew I wanted to work mainly in single crochet, and I knew I wanted texture, to mimic the texture of the painting. So I began with the moon, and used single crochet, slip stitches, and front/back loop single crochet – the stitches which would form the vast majority of this piece.


‘One corner done’. Ha! Little did I know. Still, it was a good start. I moved on to a couple of stars.


A good beginning, but that’s all it was at this stage – a beginning!
Oh, those ends. So many ends. And keeping it flat was difficult, too. In some of the joining bits of sky, I ended up using hdc and dc stitches just to keep it flat and even, whilst still trying to mimic the brush strokes with the direction of the stitches.

And don’t forget I was working on this in secret. I live with my mother, and I was trying to keep this a secret! There was an awful lot of snatched half hours while she was in the kitchen, or the odd couple of hours when she was out somewhere. And a lot of quickly shoving it all in a bag and pulling something over it to conceal it, too, if I heard her coming down the hallway to the living room.
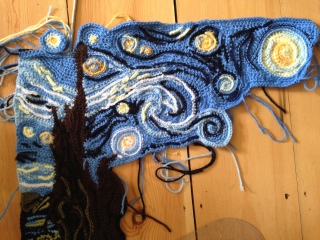
Having made a good beginning on the upper right-hand side of the picture, the next step had to be the central swirl. I could have made some more stars, but I wanted to keep the picture in one piece, as much as possible, in order to keep the proportions right. So onto the swirl. Oh boy, that was hard.


I used more hdc and dc stitches in the swirl, because of needing to build up the shape and size of it. And this was really only the very beginning of the swirl, which continues right across to the left side of the picture in a beautiful streak of pale sky. Still, it was a beginning: a basepoint to work from.


I kept going, adding two more stars. But check the caption under the righthand picture there: ‘the two stars at the left-hand side are positioned wrongly. The lower one should be higher and more to the right. But it’s too much work to rip out‘. Ha. Well. I am, if nothing else, a perfectionist. So of course I did end up ripping it out – or, to be more precise, I had to cut it out. Ouch. Ouuuch. I do not like cutting crochet. But I couldn’t live with it as it was, so it had to be done!


Onward I went, filling in the top of the sky above the swirl/between stars, and making more headway on that central swirl, and the stars that were close to it.


There’s another swirl in the sky, of course, which had to be done too. Not to mention ends to sew in. Ugh so many ends. The thing was, I wanted to avoid too much turning and going back along a row, because it changed the texture of the piece. It decreased the swirling nature of the stitches, reducing the mimicry of the flowing brush strokes. I had to in some places, but I tried to do it as little as possible. Sometimes what I did was start somewhere with a really long tail (we’re talking several feet long), so I could then use that long tail to work another row/curve/etc, without giving myself extra ends to sew in.
But I’d reached the end of what I could do for the sky without having something for the sky to attach to. If I was going to keep everything in proportion, I had to start working on something other than (nice, easy, flowing) sky.


A week or so later, I’d made a good start on the tree. The bushes to the side of it were relatively easy, but the tree itself was harder. I did a bit of foundation single crochet here, to create long lines that I could then build up into the trunk. I definitely wanted to go ‘up and down’ rather than ‘side to side’, because that’s what the brush strokes do in the picture. Working the black and khaki in slip stitches along the surface of the brown sc stitches helped with that, adding depth and texture.
It wasn’t smooth sailing, even when I was feeling it was going well. I had a tag for this on my tumblr blog, ‘secret crochet project’, and occasionally I used it without a picture just to grumble. For example:
UGH have to rip out a whole load of secret crochet project because I got the heights of something wrong. UGH. *takes deep breath* better right than quick. Right?

So…yeah. Relatively easy is, well, a relative term. Some of it was easy enough, but sometimes it was bloody hard work. It wasn’t just about breaking the picture down into shapes, it was also about keeping those shapes in proportion to each other. Making sure the tree was as tall as it needed to be, from bottom to top, to end in the right place – right up there in the sky. Making sure the streaks of lighter sky matched up on both sides of the tree. There was a lot of looking and staring and working out if a few stitches more were needed. And quite a lot of pulling out yarn and trying again!
But bit by bit, I was really making progress.


It was literally coming together, as I joined up the two bits of it:


It began to get even harder to keep everything flat. I did an awful lot of ‘work a bit, put it on the floor to make sure it was all flat, work a bit more, check it again, pull out a bit’. And repeat, and repeat, and…you get the idea. Flatness was important. Flatness mattered, and it was important to keep everything proportionally the right size and in the right position relative to other features. Still, it was progressing, bit by bit – and still entirely secret, worked in short snatches of time.


It was going so well that sometimes I just had to stop and squeal about how wonderfully it was coming together!

But even with the most exciting of projects, there is inevitably a fair amount of just plodding on, working on things that need doing but that don’t show much change…like huuuuuuge numbers of ends to sew in. Sometimes I spent my secret-crochet-time just sewing in ends. Slow, tedious work, but an important part of the whole.


I was, as you can tell, avoiding the village. Oh yes. Tricky technically, and I knew it would be fiddly, too. Yes, the village got left for some time.


Finally, of course, I had no choice. I had reached as far as I could go with tree and with sky. I needed to start the village.
So how to tackle it? Since I wanted to keep everything in one piece as much as possible, I started at the base of the tree, to begin with, and moved right, along the bottom of the picture.


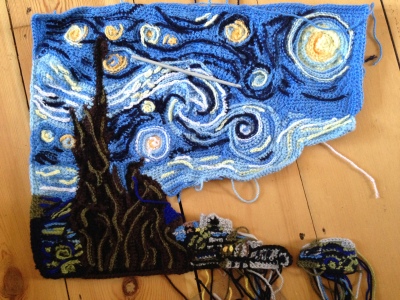
Oooohh this was so fiddly. In the sense of shapes, it wasn’t actually too bad. Even Van Gogh’s buildings are regularly shaped: rectangles, squares, triangles. But then there were the odd dabs of colour for doors or windows, and the inescapable problem that nestled among these lovely straight lines were the round lines of bushes. A bit of a headache. Just a bit. But I focused on the straight lines of the buildings, and only started added in some curves when at least a few of the buildings were more-or-less complete!


And at this point it was 30th November. And something happened on the 29th November which…rather gave me a helping hand in terms of time. My mother went into hospital for at least a few weeks. We’re used to this; her health means she needs inpatient treatment at irregular intervals. I hate it; she hates it. I wanted her home very badly……..BUT as you can imagine it was a godsend in terms of giving me hours upon hours on which to spend on this. All through December I would complete my daily Advent ornament as quickly as possible, and then spend hours blitzing this!
Three days later I’d achieved a lot.


Solidly crocheting on it meant suddenly my progress was leaping forward. Huge amount of the village done, starting to get those curves in for bushes, and building up from the righthand corner, too.
Ohh, those bushes *headdesk* so much hard work. And I was working under the misapprehension that I was playing yarn chicken with the last of my meadow. Next time I think that, I really must check my stash bag for more! Still, I managed. The meadow held out.
As I got closer and closer to finishing, I got more and more excited:


I can’t tell you how excited I was at this point. One of these last days, I stayed up until something like 11pm, working on it. I was so desperate to get it finished in time to get a frame sorted.
But from here? From here it was just ‘easy’ stuff. The picture was there. Now I just had to tidy it up, by getting all of the edges straight and making sure it was square, and I had to add further embellishments in the form of surface crochet and a little embroidery chain stitching.
So at this point, on the 8th December, I ordered a frame.
I’ve ordered the frame for Starry Night *bounces* it’s a box frame, and I found a place that custom makes them, so it’ll fit perfectly. I can’t wait to see Mum’s face when she sees it on Christmas Day!!!
I found a shop online that custom makes frames, according to the customer’s measurements – https://www.picframes.co.uk. And yes, you can bet that I double, triple, quadruple checked my measurements! I knew that I wanted a box frame for this, which limited my choices of colour and wood a little. But white is a good neutral, and I chose white for a mount, too, to set off the picture nicely.
Of course, even having ordered the frame, I still had final touches to do on the picture. More embroidery, more slip stitches across the surface – the finishing flourishes. I kept working, until finally:
I have just sewn in the final end of Starry Night, having spent the evening putting the final touches on it. And the frame is coming tomorrow.
Feeling rather emotional about it, really.
I can’t wait for Christmas to see my mother’s face 😀
I took a lot of close-up pictures of it before the frame arrived. But even with close-up pictures like these, it’s hard to convey the texture I managed to create.


And for anyone who’s interested, this is what the back looks like. Quite a mess. But nobody will ever see it!
The frame arrived on the 15th December…on a day when I had planned to go and visit my mother in hospital! So I unwrapped the frame, admired it, worked out how I would attach the picture to the mount (I’d ordered brown tape from the same company, for taping it to the back of the mount)……and then had to leave it for four or five hours while I trekked over to the hospital. Still, I finished framing it that night:
I’ve framed Starry Night and OH MY GOD IT’S SO GOOD I mean I know I’m British and meant to be all modest and stuff but I CAN’T BELIEVE HOW GOOD IT IS, it’s just SO FANTASTIC, the white mount and box frame really makes it just so stunning, I’m sitting here looking at it and grinning like an idiot, and I keep giggling, and OH MY GOD IT’S SO INCREDIBLE
I DID THAT
I DID IT
MY MOTHER IS GOING TO BE SO STUNNED
pics tomorrow, when I can take some in daylight.
I was a little incoherent, it’s true. But OH, that picture. Suddenly, framing it, it became a work of art, not just an experiment that I’d been working on for months. And given how I started out, unsure and making lots of mistakes…given how frustrated I’d been by it at times, particularly the endless ends to sew in…given all that, I think I had a right to be full of squeeful glee 😀


Oh, it’s so perfect. It’s just so perfect. I mean, it’s not perfect. It’s not an exact replica of The Starry Night. There are places where things are a bit fudged, a bit off. The church spire is a bit crooked! But it’s unmistakably The Starry Night, nonetheless. I am so, so pleased with how it came out.
So, a quick round-up of my tools, materials and techniques:
I used Stylecraft Special DK, and a 4.5mm hook. Occasionally I used a smaller hook (3mm or 3.5mm) to do some of the surface crochet. I also used a tapestry needle, both for sewing in ends and for the bits of embroidery I did.
I followed the shapes and the flow of the paint strokes as much as I could, so I did very little turning, ie I worked primarily from the right/front side of the piece. When I was working with circular shapes (ie the moon, the stars), I worked amigurimi-style, in endless rounds with no joining. I used primarily single crochet and slip stitches, with a few hdc and dc stitches in places (US terms). Occasionally I whip-stitched two sections together, but only in a very few places.
The final size is 445x360mm, and once again, there is no pattern. It was entirely freeform.
As for how my mother reacted – well, there was an awful lot of ‘wow’. And ‘did you have a pattern?’ and ‘wow’ and ‘it’s stunning’ and more ‘wow’. She’s going to put it up on her bedroom wall, but only after she’s shown it to absolutely everyone who comes into the house for the next few weeks 😀

Reblogged this on The 78th Stitch and commented:
This is just so amazing it deserved to be re-blogged
LikeLike
I think this has to be the most amazing thing I have seen! Absolutely fantastic – congratulations on finishing a piece of art! I stand in awe of this creation.
LikeLike
Thank you so much 🙂
LikeLike
The artist would bow to you himself for such a gifted work of art. look forward to more of your gifted work.
LikeLike
It IS stunning. Just wonderful.
LikeLike
I keep staring at it, amazed that I really did that 😀
LikeLike
Wow that is amazing – quite a project there! Fantastic job!
LikeLike
Thank you 🙂
LikeLike
I am soooooo impressed. How very beautiful – both the crochet and the committment.
LikeLike
🙂 thank you.
LikeLike
I wish there was a Wow button to click instead of just Like. What a work of art you’ve created. It’s beautiful and such a treasure for your mother. Vincent would definitely approve. 🙂
LikeLike
😀 I like to think he would.
LikeLiked by 1 person
Absolutely amazing!,
LikeLike
Thank you so much 🙂
LikeLike
Hello Catherine, Stunning. I love freeform and your beautiful creation is very inspirational. love to try it one day. Ruth
Sent from my iPhone
>
LikeLike
Thank you so much 🙂
LikeLike
I loved it I would like to try one day
LikeLike
Absolutely fantastic, you have done an amazing piece of work, beautiful!
LikeLike
Thank you so much 🙂
LikeLiked by 1 person
What they all said, WOW! That is probably the most amazing crochet I’ve ever seen and so brave to even attempt it. WOW!
LikeLike
Thank you 🙂
LikeLike
I cannot think of a word to.convey what n how I feel of your magnificent crochet! Its way past exquisite, way past beautiful……. WOW just doesnt quite cover it……. OH WOW its EXQUISITE!!
I bow to your magnificent crochet of Van Gogh’s Starry night.
Hugz
LikeLike
Thank you so much 🙂
LikeLike
Wow again! Thank you for breaking down the creative process. You are awesome!
LikeLike
You’re very welcome 🙂
LikeLike
I have no words. This is just … magical. Love it!
LikeLike
Thank you 🙂
LikeLike
Words can not even begin to express how beautiful this is, how talented you are, and how lucky your mother is!
LikeLike
😀 thank you.
LikeLike
This is just Amazing. Breath taking. Stunning. Wow.
Greetings from Holland.
LikeLike
Thank you 🙂
LikeLike
Wauw, this is amazing. As the doctor would say: GERONIMO 😀
LikeLiked by 1 person
😀 thank you so much.
LikeLike
Wow. And I’m grinning and crying and WoW and just, well, *sighes*, WoW ❤
LikeLike
😀 I did a lot of that too! Once it was framed and finished and perfect, I just sat here giggling like an idiot, practically in tears, so so happy with how it had turned out. I couldn’t bear to put it away for nearly a week – in the end I wrapped it and hid it just in time for my mother’s discharge from hospital!
LikeLike
Stunning work, with such a great story behind it, I could feel my heart beating faster and faster, along with yours, as I read about your progress. Magnificent job all round! 😀
LikeLike
😀 thank you so much.
LikeLiked by 1 person
Absolutely incredible! Such inspiration!!
LikeLike
Thank you so much 🙂
LikeLiked by 1 person
I have no words, it is also one of my favourite paintings. Stunning,stunning, STUNNING!
LikeLike
Thank you 😀
LikeLike
I love this – you did an amazing job. I’d like to make one for my daughter – she went to art college an this is her favorite painting. I love it too along with Dr Who like your Mom.
LikeLike
😀 it’s definitely a challenge, but the result was so worth the attempt.
LikeLike
Stupendous achievement 🙀😍
LikeLike
Thank you 🙂
LikeLike
This has been on my bucket list. I will struggle on my own, but you have inspired me. ThankYou.
LikeLike
You’re very welcome 🙂 do feel free to send me a message if there’s anything in particular you want to ask about what I did. I can’t provide a pattern, but I can share my experiences 🙂
LikeLike
Absolutely stunning! I freaking LOVE how much texture you were able to put in there, knowing that you said the pics didn’t really capture all of it 🙂 Thank you for being an inspiration to me to try out free-form crochet. It has always intimidated me a bit. I have made a “yarn-art” piece where I cut out different shapes in foam board, put double-sided tape on each piece, then wrapped different colors of yarn around each piece and then pinned each piece onto one solid sheet of foam board, making a 3D image of a beach scene 🙂 It’s not that pretty, but I am super proud of it 🙂 I was able to do fun shapes with the clouds 🙂 I love all the many and varied things you can do with yarn 🙂 Thank you for sharing your talent and your art 🙂 GOD BLESS 😀
LikeLike
Thank you so much 😀 you should definitely try freeform! It’s quite freeing, in many ways. But don’t start with something as complex as this, heh 😀
LikeLike
I can’t stop admiring your absolutely stunning work of art! The love and commitment you put into this shows. Your mother must be an amazing woman to have such a caring daughter.
LikeLike
😀 well, I think she’s amazing. She might disagree!
LikeLike
That is brilliant, I love it. It was an inspired idea (I think you might have started something there…. I wouldn’t be surprised if we see other people attempting their own works of art) and outstanding for your first attempt at freeform crochet. I have completed my first attempt at freeform crochet recently too (I haven’t written a post about the completed item yet but there are posts about its progress) so I totally understand the challenges and frustrations of it…. And the endless struggle to keep it flat!!! The question is…. What now? Are you going to do more freeform crochet? Are you going to try another work of art?? I am going to watch with anticipation. Respect!
LikeLike
Now I am going back to the blanket that I’ve been working on in tandem, heh. I want to get that finished. Then, we’ll see. I might be tempted to try another piece of art, but the question then would be ‘where to put it?’.
LikeLike
Mom is right, it’s a huge WOW.
LikeLiked by 1 person
Wow. Just wow. Your words just flew off the palate. I so enjoyed reading this post. Your colour choices seem so perfect and it stands as a masterpiece in its own right. Your mother achieved a diamond in you. What a wonderful gift you have given her back. Huge kudos. I’m in awe x
LikeLike
🙂 thank you so much.
LikeLike
I was grinning and cheering with you and I only read about your masterpiece!!!! wow well done. Happy new year.
LikeLiked by 1 person
Thank you 🙂
LikeLike
Stupendous! Only freeform could have done justice to Starry Night, and you’ve smashed it.
LikeLike
Thank you 🙂
LikeLike
Utter genius. This is the most beautiful, inspirational crochet piece I have seen. I adore Van Gogh and your representation is wonderful!
LikeLike
Thank you so much 🙂
LikeLike
I want to try his sunflowers now! 🌻 🌻 🌻
LikeLike
Do! Sunflowers might be easier than this 😀
LikeLike
Thank you for sharing your process in such detail! Freeform crochet is something I have resolved to do in 2018. You have helped tremendously with how to begin and how to ‘think’ in crochet to achieve a certain result. You should be very, very proud of it. From beginning to end – all the love you put into it perfected any ‘mistakes’ that you may have seen, and it is now, indeed, PERFECT.
LikeLike
Thank you so much 🙂 I’m glad I helped you feel able to begin freeform 😀
LikeLike
I realize this is way after the fact, but I’ve just found your blog tonight – and this is absolutely amazing! I agree with previous comment that your comments in the blog are helpful for those of us who may want to try doing ‘freeform’ crochet – so thank you for sharing that information!
I’d curious if you took a picture of your Mom when she opened this…I’d love to have seen her face! This rendition certainly expresses your deep love and devotion to your Mom! She is a lucky lady – but I’m sure she has earned that devotion from you,
Stunning work! If you entered this in a competition, I’d be willing to bet you’d take a first prize for sure! Beautiful work! Thank you for sharing!
LikeLike
Thank you so much 😀 my brother took video of our mother opening it, but I can’t post anything; she would throttle me! She doesn’t like pictures of herself being taken at all, but I refused to let this one pass without record.
LikeLike
Such talent!
LikeLiked by 1 person
Absolutely amazing. I can’t even understand free form crochet, never mind actually try it! If you’d like to give lessons I’d be happy to learn!
LikeLike
I’m not sure I’d be a good teacher 😀
LikeLiked by 1 person
You never know!😄
LikeLike
This is awesome! I absolutely love this. Thank you for explaining your approach to the task. Very interesting. Congratulations on this amazing achievement!
LikeLike
Thank you so much 🙂
LikeLike
Absolutely stunning work! I am so happy to have found this and thank you so very much for the explanation. Also my congratulations to you on such an accomplishment!
LikeLiked by 1 person
Thank you 🙂
LikeLike
This is absolutely amazing! Well,done! I have been thinking of trying freeform for ages and this is so very inspiring. 🙂 You must be so proud of it.
LikeLiked by 1 person
This is absolutely amazing. And by the way, your Mum is cool! Vincent and the Doctor is one of my favorite episodes and the only one I have saved on our DVR so I can watch it when I need a good cry. I mean, his FACE at the end! Although David Tenant is MY doctor, hee hee. Best wishes for your Mum’s health and your continued crochet brilliance! I too have always wanted to try freeform, but after reading your adventures and looking at your pictures I think I’ll stick to regular crochet! Thanks so much for sharing your work.
LikeLike
I came across this being a crazy fan of the painting like your mum .. and I just love it.. it’s beautiful! ❤ from Bangladesh
LikeLiked by 1 person